Wednesday, June 30, 2010

TAG You're It! Easy instructions on journaling tags for beginner scrapbookers.

As promised.... here comes *easy as pie* directions on how to make a cute tag for journaling.


Step One: Type or write your journaling first... this helps you measure other things later.  Try using plain white or lightly colored paper (or something with a very faint pattern... we don't want to distract from all that poetry now, do we?)

Step Two: Pick out the patterned paper you want as the background for your tag.  I chose stripes... funky stripes to match funky argyle.

Step Three: Find a cute little button.  (BTW people: my favorite place to get buttons is from all those annoying little button envelopes that come with new clothes.  Before I started scrapbooking, I used to keep mine in a little drawer... with the Martha-Stewart-like intention of actually sewing a button back on if one happened to fall off.  Instant killer of button-sewing homemaker skills?  Safety pins!  So what do we do with the buttons?  Glue them on scrapbook pages.  *Applause please.*)

Step Four: Cut out your journaling into a rectangular shape and decide how much bigger you want the tag to be... it can be a subtle 1/4 inch border, or more decorative and bold with a 1 inch or larger border.  (Don't adhere the journaling to the patterned paper yet.)

Step Five: Gently (without creasing) fold your patterned paper in half (hot-dog style).  Take some scissors and snip off the corners of one side at about a 45 degree angle.  The point of folding the paper is so the angles are identical.  I learned this the hard way.  Don't cut it all the way into a point; you're gonna want it to look like this:  


Step Six: Take a small snippet of the same paper you wrote your journaling on and cut a long skinny rectangle.  Use a glue dot to stick it on, leaving part of the rectangle hanging over the edge of the patterned paper, and then fold it around to the other side.

Step Seven: Use another glue dot to stick your button in the center of the rectangle from Step Five.  Adhere your journaling and you. are. done!

What do YOU like to use tags for?  Any other suggestions on techniques?


Beginner scrapbooking tip: I love using tiny tags to write the month and year.  This way, the tag doubles as a cute embellishment and will help jog your memory of when those photos were taken.

Tuesday, June 29, 2010

Pretty, Pretty Please.... with a Cherry on Top!

In this scrapbooker's very short time here in the blogosphere, I've had the good fortune to interact with some amazing women who blog about crafting, kids, recipes, housework, the joys of being a lady, life in general, etc.  I feel SO honored to have been given an award by Jessica at JessRaquel "Mo Shíorghrá".  So thank you, thank you, thank you!!!  A little bit of recognition goes a loooooooong way!


The rules for this award are:

1. Thank the person who gave this award to you
2. Copy the award and put it on your blog.
3. List three things which you love about yourself.
4. Post a picture you love.
5. Tag five people you wish to pass this award on to.

#1 & 2, check.  Here goes for #3:

* I love my green eyes.  They have tons of gold right in the center and are surrounded by a very dark olive green ring.
* I love that I have a way with words.  When I sit down at a computer, things tend to just pour out of me... and sometimes what I have to say even sounds poetic.  Some say a picture is worth a thousand words; I say a sentence is worth a thousand emotions.
* I love that I'm passionate, emotional, and never go down without a fight.  My friend Seth used to call it "flawless fire".... ahhh, love that.

Here we go for #4: This picture was taken when I did a modeling show for my friend Roxy.  This dress fit me like a glove!  I felt like a princess!


And for #5: Here are just a few of the amazing bloggers I've interacted with over the past month.  This award is for you ladies!

More on scrapbooking in a few short hours... stay tuned, pretty please!

Monday, June 28, 2010

Accolades for Argyle - Scrapbook Pages that Dress to Impress

Mommy Marsha is going to be soooo proud of how serious her two boys are when getting their photo taken! =)

Here's a fantastic way to make pages personal and particularly memorable.  Think about a page you want to make to highlight a person... Perhaps for their birthday.  Now think about that person's favorite color or something they like to wear.  Now walk, waddle, rollerskate, or drive to your nearest craft store and pick out some unique paper. 


I did a two page spread to highlight two birthday parties for two fantastic brothers.  Guess what?  They both love argyle.  Ben, the older brother, loves argyle sweaters.  Matt, the younger brother, loves argyle socks.  Both of these men rock argyle like nobody's business.  They wear it loud, they wear it proud.  So young grasshopper, what would be the perfect paper for these men?  You guessed it.  ARGYLE.  And guess what else, they both said, "Hey, argyle paper!" when they checked out this layout.  Duh boys.  Major duh.  (But secretly, I was *very tickled* that they noticed.)

Tomorrow, check out more tips for these layouts... including my first attempt with stamps (yikes!) and how to turn a rectangle, button, and glue dot into a cute tag for journaling.

Beginner scrapbooking tip: The more pages you make, the more it'll seem like time just sorta blends together.... so make sure to write the date and year somewhere on your page.  In 50 years, you'll be glad you did!

Friday, June 25, 2010

It's fun to be an idiot... no one holds you accountable for, well, anything!

A Beginner's Guide to Essential Scrapbooking Materials
(This is me being stressed over my idiotness.)
Friends.... silly me.  Here I am on my merry blogging way, writing all kinds of fun (IMHO - in my humble opinion) posts about scrapbooking.  However, I have yet to post a somewhat comprehensive, totally subjective list about which supplies a beginner scrapbooker needs.  Well, I did actually do that here, but there wasn't a whole post dedicated to it. 

I got an email from Jessica - who writes a blog I read religiously, JessRaquel "Mo Shíorghrá", and she asked me for my suggestions on what to purchase.  So she gets the credit for this worthwhile post...

If it's your first trip into the black hole of the crafting world, TAKE A LIST.  I can't stress that enough... oh and maybe give yourself a time limit.  The "I'm just gonna browse for 10 minutes" turns into "Oh my goodness, why is my credit card getting declined, AGAIN?"

Here are my *essential* suggestions... stay tuned for suggestions regarding what to get *after the essentials* and for suggestions regarding *don't even think about it until you're a pro*.  (And let me apologize for being an idiot and not doing a post like this sooner... in the future, you can reference lists like this one on my page Scrapbooking Musts.)

1. Definitely buy a kit. Michael's Craft Stores has tons of them... they contain coordinating paper, embellishments, and a scrapbook with 10 page protectors (which will give you 20 layouts front and back). The best thing about kits is that you'll be able to see what type of embellishments you like to work with and then you can buy more of those, and you'll have lots of things that are automatically coordinated with each other. Some kits also come with layout ideas.  The one below is from K & Company and can be purchased on Scrapbuck.com for $9.00!!! For ideas on how to make layouts once you have your kit, check out Scrapbooking Kits & Coordinating Paper.


2. Get a good paper trimmer. I like the one by Fiskars... it can be purchased on Amazon for $14.50.  If you want to read more about my love affair with Fiskars, and for tips on how to use it, check out why Fiskars are Your Friends.


3. Get a glue dot roller. I like the one made by Scotch because it's sticky enough to "stick" - but if you have an "oh, shit!" moment, you can still safely pull the item off the page. You can also get larger glue dots which are more heavy duty.  I suggest a dot roller versus the adhesive square rollers... those tend to get alllll tangled up which, frankly, makes me want to pull my hair out.  You can buy this one for about $11.00.


4. Get a skinny black marker/pen for journaling. I like the fine tip Sharpies.


5. For free layout designs, visit scrapbooksetc.com -- they have tons of ideas. I spent about $30 on a book (but not the book I reference below... that book is WELL worth the money!) and wish I'd just done some hunting on the web first.  But if you really are looking for a book that will give you inspiration, be sure to pick up 52 More Scrapbooking Challenges.
 

I would LOVE to hear your suggestions and perhaps add them to my list!  So tell me, what did you buy when you were first starting out?

And BTW... none of these companies/people paid me to endorse these products, nor did they send me any free gifts.  I'm just blogging about them because I like them.  So there.

Tuesday, June 22, 2010

5 Reasons Why Ribbons Make Fabulous Embellishments


This year I turned 29...  And you know what?  It actually sorta feels like I'm either still 16 or turning 16 again.  Turning 29 made me realize (well, actually, scrapbooking and journaling about my 29th birthday made me realize) that I am still basically the same girl I was at 16.  I still want frozen yogurt at 10:00 a.m.; I still sing when I'm alone in my car.... At. The. Top. Of. My. Lungs.; I still paint my nails blue, blue, blue; and I still cry like a girl, just because I can.

And you know what else?  Using pretty ribbons and sparkly sequins as embellishments makes me feel pretty good, too.  Here are my TOP 5 reasons why ribbons are a fabulous embellishment.

Monday, June 21, 2010

Shown up by a six-year old... the joys of scrapbooking!

For fabulous and funky tips and tricks for kids, and to see how this beginner scrapbooker was shown up by a six year old, click here.

Back to our regularly scheduled programming tomorrow: Why turning 29 makes me feel like I'm 16 again.  Stay tuned.

Thursday, June 17, 2010

If there's pretty paper in hell, I'll scrapbook there, too.

It just occurred to me that most scrapbooking pages memorialize a particular day or event. But on this layout, you'll see I chose a series of events, i.e. several photos that were taken on different days... but all related to each other: Football Season. Growing up in Utah, we didn't have a professional football team, and the American love of football just didn't quite click for me (except for the cute butts in tight pants). But ever since moving to San Diego four years ago, I've learned (sometimes rather unwillingly) to "heart" the football season. In reality, I love the things that come with football season... barbecues, beer, grown men hollering and cussing at the TV. Lovely, isn't it?

Well last June, I met Matthew... who has season tickets. For people who haven't been to a professional football game I will let you in on a little secret. They are AMAZING. Seriously. So. Much. Fun. Going to almost all the games last season took me from "hearting" football to actually having a real interest in the Chargers and their stats. And luckily, my camera was along for the ride. So here it is:

What you might not be able to tell from the pictures is that these layouts are on white paper and all those colored paper stripes match up.  As a non-measurer, it took me, well, forEVER to get them the same size and in the right location. 

Let's focus on the steps for creating a layout that showcases a series of events.
1. Pick the series of events. Duh.
2. Try to choose several photos from different days, but that are similar enough that they coordinate with each other.  In this case, in all the photos we are wearing team colors (except for Matthew who managed to show his naked chest not once, but twice in this layout).
3. When deciding where the photos should go, I like to keep them really close together... this gives them cohesion even though they are from different days. (Leave plenty of empty space for embellishments.)
4. Think about what makes the series of events unique and pick paper to accentuate.  Here I used team colors... other examples would be using paper with snowflakes for a ski season layout, paper with letters/numbers/apples for a school year layout, paper with suns or beach balls for a summer layout, etc.
5. Pick out some embellishments that further tie the paper with the events & photos.  In this example I picked a football and an actual Chargers bumper sticker.  Craft stores carry a ton of stickers and chipboard embellishments, but those can get pretty expensive - especially when they are very specific to just one type of layout.  I saw a really cute football chipboard at Michael's but it was about $5.  If you are a bit artistic you can draw your very own (or in my case, after several failed attempts, let your boyfriend join in on the scrapbooking fun and draw a damn football for you... who knew that drawing an oval could be so challenging?)


 6. After you have chosen a title, find a cool font or other type of lettering to tie it all together.  I wanted a font that reminded me of cheerleading and this one did... I'm not quite sure why... anyway, I printed the title nice and big and cut out all the letters (here is where it would have been nice to have a die-cut machine... but this is about being budget friendly... so I'm sorta against those machines for beginner scrapbookers.)  I used the same font in a smaller size for the "Go Bolts".

7. For more pizazzzzzz, add a few more things... like.... BUTTONS.  Buttons happen to be my favorite embellishment.  They are cheap like cheerleaders. They add a lot of texture to a page.  They are colorful.  And they are pretty hard to mess up. 

And there you have it... What you can't see, however, is the approximately 27 hot dogs I ingested that season, the men who sat behind us who insisted that bringing a cowbell to every game is the finest way to show their support, or the fact that the Chargers blew their shot at the Superbowl, again.  Ahhhh football.


Tuesday, June 15, 2010

Do's & Don'ts: Etiquette for Beginner Scrapbookers

1. Don't feel bad about cropping unwanted people out of photos. This is YOUR book. YOU are spending your time to make it beautiful and YOU should feel fabulous every time you open it. (Here is a purrrrfect example: Miss Bunny did not want Cleveland the Cat in the photo.)


2. Do feel okay about going back and changing a page if it doesn't bring a smile to your face when you look at it. I try to only scrapbook when the portion of my mood that's good is 51% or
greater than the percentage of my mood that's bad. (Isn't it fascinating being an emotional woman... this percentage, my friends, can change on a dime.... super fun, huh!) Anywhoooo, I try to scrapbook when I'm happy so my pages reflect that.

3. Don't misinterpret #2 to mean that all your pages have to be "happy" pages. Pages should reflect the many aspects of your life. And you may have been going through a difficult time when the photos were taken or the page was created, so that "smile" I refer to in #2 can be a smile of relief, a smile of joy, a smile to realize how far you've come... or even how far you have yet to go. (For two fabbbbbulous posts on scrapping about your "real" reality, rather than painting a picture of perfection, visit Just me My Soldier and our 2 little chicks and It's Me, KP.)

4. Do remember to bring yourself out from behind the camera. As scrappers, we are always taking pictures, trying to capture those "scrappable" moments. But I encourage you to do a few pages that are based solely on fabulous you. One of my favorite pages is "Keep Your Green Eyes on the Road". I got this page inspiration from Elizabeth Kartchner's book 52 More Scrapbooking Challenges. I wanted to remember allllllll the time I spend in rush hour traffic (see the clock hands are at 5:00?). Okay, yes folks, I did take these pictures.... while I was driving.... so unsafe, I know. But hey, they turned out pretty cool, huh?


5. Do ask for people's opinions if you hit a creativity road block. Sometimes people have better ideas than we do. Period. (Ok, maybe their ideas are better at that particular moment!)

6. Do look at other scrappers' layouts for the nuts, bolts, and inspiration. I'm not saying be a copycat. (I'm pretty sure that's frowned upon by the lawmakers in the great state of California.) However, you can learn a TON by first picking out a few photos you want to work with, finding a page or layout that you love, and using your own coordinated paper and embellishments to make it your own. No matter how much you read on this blog and other blogs for beginner scrapbookers, at the end of the day, you gotta hit the proverbial pavement and start scrapping.

7. Do NOT let scrapbooking give you headaches or anxiety. My borderline severe Type A personality sometimes spends way too much time trying to get it perfect or just right. There are no rules. There are no boundaries. And this should make you feel empowered. (Oh God, that sounded like a Celine Dion song... maybe I should wrap it up for the day.)

....Thanks to shimelle.com for the idea to do a blog post that's a list.

Beginner scrapbooking tip: For the borders on the two photos of my loooovely green eyes, I took some basic black paper and distressed it using a flathead screwdriver. Just be careful not to tear the paper, and don't use the screwdriver to stab your boyfriend for watching too much car racing.

Monday, June 14, 2010

Perfect Picture Popping - Showcasing Colorful Photos for Beginner Scrapbookers


Happy Monday! One thing I love about photographs is that they jog my memory (I don't like anything about jogging, but I do like anything that helps my memory). And one thing I love about scrapbooking is the showcasing of photographs that would otherwise sit in a box amongst thousands of others.

Our lesson today will be about making photos POP. Photos can do many different things, depending on what you want for that scrapbooking page. You can choose colored and/or patterned paper to actually match the photos, you can select a particular color in the photo and use similarly colored embellishments as accents, or..... drum roll, please.... you can take a vividly colored photo and make it POP even more by using black and white paper.
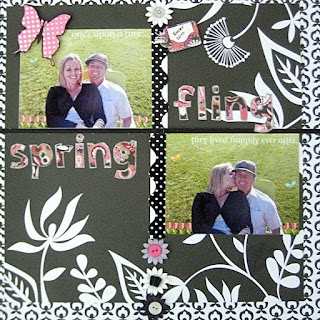


The photos from this page are from Easter. On Easter this year, I felt my *first* big earthquake. A bunch of people from Waters End (the name of our neighborhood, which is much like Wisteria Lane on steroids) had an Easter egg hunt in the park. As the kids were busy finding eggs, the adults congregated in a circle, enjoyed a few cocktails and reminisced about their childhoods. I felt the ground start to move, and I mean really move. I thought to myself, "These damn kids sure are heavy-footed! They're shaking the entire park!" But friends, I'm pretty quick and soon realized that there weren't really any kids in my general area. Then I thought to myself, "These damn drinks are really doing the trick! They're shaking the entire park!" Again, quick KeKe realized there's no way that could actually happen. But the ground just kept on shaking and finally someone said, "Holy cow we are having an earthquake." And my next thought after that was, "Hmmm, I sure do hope the ground opens up and swallows a certain housewife who's sitting across the circle from me." (That's a story for another day.) Alas, the ground did not open up... but I'll tell you what, the reason for my huge smile in the picture above was because I was daydreaming about that housewife falling down, down, down into a hole, never to come out (oh and because I was sitting with my handsome boyfriend).

And so... what better way to memorialize this particular day than with a page that makes those pics pop (lots of "p's" there... sorry, it's Monday). Here were my steps:

1. I edited the pics using Picnik to add the flowers, butterflies, and text directly to the photo, and to get rid of a chair that was in the background. For before and after, click here.
2. I selected a black and white pattern that had large flowers to keep with the "spring" theme, and I selected a smaller patterned black and white paper to accent (remember our lesson on large & small patterns?). I trimmed the larger pattern paper and placed it just a bit off center on top of the smaller patterned paper. Sometimes it's more interesting for things to be a little asymmetrical.
3. (Please don't focus too much on this step, as the main lesson here is making photos pop.... here, I'll make the text really tiny.) I wanted the photos to be somewhat grid-like because I already had my title in mind (more about choosing titles in a later post). I wanted the two pics and the two words to all be opposite one another in an imaginary 4-squared box.
4. The bright green of the grass against the black background has fabulous contrast -- but if you imagine it without the colorful title and pink embellishments, it might be a bit boring. I added pink flowers onto the photos and so I thought that would be a good color to use as an accent. *However* when using black and white paper, you can pretty much use any color as an accent. I'd imagine this page would've looked just as good if I had selected green accents, to match the grass.
5. For the title, I used some alphabet stencils and cut each letter out. Then I took a silver marker and outlined each letter... again, helping with the "pop" effect. Because the letters have lots of black in them, they may have blended in a bit too much with the black background without the silver outlining.

6. I also used a pre-cut pink butterfly and outlined it in black to have it "pop" away from the green in the photo (and see, I told you I had a big smile!).

7. Add a few more embellishments to top it all off. (I used paper flowers and buttons from scrapbuck.com and arranged them in a straight line to coordinate with the grid-effect of the photos and title.)


And there you have it, perfectly "popped" pictures possessing polished precision with pleasing plastic and pretty paper petals.

Beginner scrapbooking tip: As beautiful as scrapbooking pages are, sometimes the true delight that scrappers take is knowing what went on behind-the-scenes, so to speak, in the photos. This page will always remind me of that earthquake, but to many viewers, they will just see the photos and embellishments. And that's just fine with me. =)

Saturday, June 12, 2010

Making the Magic Happen - A Not-So-Significant Peek into this Beginner Scrapbooker's World

As I was stumbling through the black hole that is the blogosphere (see, I'm being productive at work!), I found shimelle.com.  Shimelle lives in London and has a huge following.  She posts about a variety of subjects... and *woohoo* has TONS of great info on scrapbooking, blogging, and even a class called "Blogging for Scrapbookers".  (The class was actually held in November, but the lessons and info are still available to download and you can work at your own pace... so check it out if it sounds like it could be helpful for you, too.)

Being a new blogger, a new scrapper, and so grateful for any assistance along the way, I signed up for the class.  My intentions for taking this class are to create the very best blog I can and to constructively help other new scrapbookers.  Oh, and because I'm addicted to scrapbooking... Yes friends, I dream, eat, sleep, everything scrapbooking.  Is it strange that during holidays or special events, I'm daydreaming about the scrapbook page I'll be able to create for that event???  Matthew thinks I'm crazy; I think Matthew is right... Bunny loves that I scrapbook because she can take loooooong naps next to me while I'm gluing and snipping away.

Also, I'm hoping to blend scrapbooking tips with funny snippets about the actual photos in the scrapbooking page.  I welcome any and all comments... whether they be about my blog, my scrapbooking pages, or if you just want to tell me that I'm awesome.

And here is where the magic happens... on the couch, with a tray on my lap, and stackable tupperware filled with embellishments spread out everywhere.  Usually Matthew is on the couch watching Formula 1 racing and Bunny is curled up and snoring.  Sometimes I'm lucky enough to have my scrapbooking buddy, Miss Hannah, on the couch next me creating beeeeeeeautiful pages of her own.  


This is my *first* scrapbook.  And honestly, I've already had to buy extra page protectors and binder extensions.  It is literally bursting at the seams... somewhat like my True Religions after a nice Mexican meal and two (okay, three) margaritas.

So readers, where does YOUR magic happen?  Where is your favorite place to scrapbook?

Friday, June 11, 2010

Flip Off!

First and foremost, THANK YOU to Gigi at kludgymom for creating Friday Flip Off... this is my first one and I must say, I can already feel the therapeutic effects.  Check out her blog to follow along!

To that muscle on my back between my shoulder blades:  Why have you been sooooo sore lately?  What did I do to deserve FOUR days of pain and interrupted sleep?  FLIP OFF!

To that guy who cut me off, then gave ME the finger (and other obscene gestures):  Really, dude?  You're a grown man.  You're disgusting.  The nerve of people who drive like idiots, then have the audacity to behave as though it was my fault!  FLIP OFF!

To the skin on my face: Where are all these zits coming from?  We are not in highschool anymore, so please, no more breakouts... FLIP OFF!

And for all you regular Kreate by KeKe readers.... here is a little scrapbooking snippet.  The absolute BEST place to buy inexpensive crafting supplies is scrapbuck.com.  I'm not endorsed by them, but I know they are awesome because I was recently at the Scrapbook Expo in San Diego and they had a huge booth... Most of their items are $1.50-$5.00.  I'M NOT KIDDING.  I gave myself a $100 budget at the expo and spent the majority of that money at the Scrapbuck booth... Just imagine all the goodies I got!!!  And they don't skimp on quality either.  Happy Friday!

Thursday, June 10, 2010

4x6, 5x7, 8x10 - For Beginner Scrappers, Size Matters!

Friends, I would argue (and I do argue, about almost everything) that the photo(s) is the most important aspect of a scrapbooking page. After all, without photos, scrapbooking probably wouldn't exist. In my very early scrapping days, I had a bunch of random 4x6 photographs. 4x6 is the standard printing size, but I quickly learned that using only 4x6 photos severely limits the creative aspect of each page. If you have a photo-printer, I suggest purchasing some photo paper that is 5x7 & 8x10. However if you are a budget-conscious scrapper, I highly suggest uploading your pictures to and printing from Snapfish. I find that Snapfish has ridiculously good printing prices and they mail the photos to you within a few days.


****Here's a warning: If you are using Picnik to edit photos (click here for an example of how beginner scrappers can edit photos), Picnik does not have the capability to pull photos from Snapfish.... super annoying. So it may take a little more leg work but it's pretty simple. Upload your pics to Picasa, use Picnik to pull Picasa photos and edit, then save them to your computer and upload them onto Snapfish. Select which photos you want to print from Snapfish, and then wait *patiently* for them to arrive. (May I suggest having photos for several upcoming scrapping pages printed at one time.... There's nothing worse than a scrapper on the loose with no photos!)


Here is an example of two pages I did where I only had 4x6 prints. You'll notice on the right side page that there's quite a bit of empty space, where a larger photo would have made the page more aesthetically pleasing. (For info on that cute ribbon border, please click here!)


So how do you choose which size photos you should order?
1. Decide which photo you want as your main focal point: this photo should be the largest. (If you are making a page with only one photo, then this step is the first and final! Easy, huh?)
2. Then choose a few photos you'd like as accents. With how inexpensive prints are, go a little crazy and print some that you might not be 100% sure you want to use. (We're not trying to "pre-plan" our layout prior to getting prints, and you'll want a good assortment.)
3. The accent photos should be smaller -- and remember from our lesson on Fiskars, you can always trim photos even further.
4. Where accent photos go and how many there should be will be discussed in a future post on layouts. (I'm hoping that I'm not putting the cart before the horse here... or does the cart go before the horse...?)


So what have we learned? Variety is key and size matters! Beginner scrapbookers will thrive on having many options from which to choose (there you go Mom, I didn't end my sentence with a prepositional phrase).


Beginner scrapbooking tip: Notice on the pages above that I used a cranberry colored paper and creme colored paper that both had a similar polka-dot pattern. Similar patterns on different color paper compliment each other well (for more beginner tips on coordinating patterned paper, click here). Also, notice that the polka-dots really make the falling snow stand out in the three adjacent pictures on the right side page.

P.S. Regarding those magenta leggings I'm sporting: no they aren't mine, no I didn't lose a bet, YES I did stop traffic. Now that's a double entendre if ever there was one.... Oooh, there's my French coming out again!

Tuesday, June 8, 2010

Fiskars are Your Friends: Snipping Tips for Beginner Scrapbooking

Ahhh Fiskars.... You make my scrapping life SO much easier.  My once crooked eye has become straight, measuring is my friend, and that sharp blade of yours takes to photos like melted butter.

Beginner scrapbooking friends: today's short-but-soooo-sweet tip is the importance of a good quality trimmer (you can pick one up at any craft store for about $15).  I've mentioned my Fiskars trimmer many times, but I thought it deserved it's own post.  That vertical clear plastic strip you see below actually lifts up (without detaching).  There's also a blade that fits perfectly in the groove of the vertical strip.  And that baby is sharp, so watch your fingers (and kids' fingers, too, if you are working on any projects from Kids Scrapping). For a perfect cut, simply slide your photo, mat, or whatever else needs a little snipping, under the vertical strip, position carefully (more on positioning below), hold the vertical strip firmly in place to prevent slipping and sliiiiiide the blade along the groove.  Voila!  Perfectly trimmed papier!  (Isn't it nice that out of three years of French, I only remember "voila" and "papier"?!)


Now, not only does the Fiskars trimmer have measurement capabilities across the top, the vertical plastic strip doubles as a secondary ruler.  You can essentially measure one piece of paper horizontally and vertically at the same time.  And if inches and centimeters allude you, there are also columns and rows to help line things up. 

Beginner scrapbooker tip: As much as I love the Fiskars, the one slight issue is that the side arm (which raises and lowers for ease of storage) doesn't lock in place once it is extended.  My suggestion is to give it a little nudge while you're getting everything lined up to make sure it is fully extended, in order to avoid "crooked-straight" lines.  Happy trimming!  Now if only trimming bangs was this easy....

Tuesday, June 1, 2010

Scrapbook Kits & Coordinating Paper

As I've mentioned, I'm a huge fan of scrapbooking kits for those of us who are just starting out. In this next layout, I nixed the idea of creating two 12 x 12 pages for each event (phew!). The kit I picked up at Michael's came with about five different patterned papers - all of which coordinated beautifully. In this page, I used four of those patterns and pieced them together in this order:


Step One: I selected the polka-dot paper for my base page.

Step Two: I selected the dark brown wood-like paper for my photo mattes. (I wanted to select a paper that matched the dark brown polka-dots in the base page, and also one which would make the outfits in the photos "pop".) I matted the photos using glue dots and my trusty Fiskars and set them aside.

Step Three: I picked the busier two toned leafy pattern and cut big blocks of it to place over the base page. (Truthfully, this is where the art of scrapping gets a little tricky. You sorta just have to play around with the blocks and the matted photos from Step Two to figure out the overall "look" of your page.)

Step Four: I picked a fourth paper, which had a larger leafy pattern and lots of empty space for journaling. (I also cut a small piece of this paper and placed it behind my vellum title. More about vellum titles later. )


Novice tip: By using "blocks" of the busier leafy pattern paper AND of the larger leafy pattern paper, I created some repetition and balance. Result? Fabulous layout, if I do say so myself!