Showing posts with label cards. Show all posts

Wednesday, August 25, 2010

Happy 65th Birthday (for the 29th time)! Another card-making idea for beginner scrapbookers.


Remember my post about birthday cards?  Well people, I've done it again.  Done what, you ask.  I've made another birthday card.  This isn't rocket science ~ and I'm hoping that my lovely readers have learned to deal with "questions o' rhetoric" and dryyy sarcasm.

Soooooo, this time, the lucky recipient is my fabulous (fabulous = classy, elegant, always ladylike) Nanny.  I think she's celebrating her 65th birthday for about the 29th time.  I wanted to create a card that showed my Nanny the two generations of lovely ladies who have learned so much from her and aim to follow in her ever-graceful footsteps.

Here are some simple steps to fabulosity...

1. Using Picnik.com, I chose to create a horizontal collage.  I found four pictures of Nanny, mom, myself and my sis and cropped them to similar size (2x2.5 - which is a particular setting on Picnik's cropping), then changed them to black and white.  All the photo editing was done right on the Picnik website. 

2. Then, still in Picnik, I created a collage.  This is really simple to do and is basically just drag-and-drop.  Picnik sets up the spacing and the cool black lines in between the photos.  Save.  Print.  *Love* 

3. Select the paper you want to use and fold it in half... again, I like top-to-bottom folding because it's easy to stand the card up.  Set your photo strip off-center for the cool artsy effect.


4. Add some whimsical words or phrases... The three I used came from a sticker set (yes, these are awesome stickers that look like typewriter font and are even somewhat embossed) on Scrapbuck.com for, you guessed it, about a buck.  Isn't life wonderful?

5. I also used my favorite butterfly punch and drew some squigglies and dots to give him some character.  Also note, the butterfly adds some repetition and coordinates with the butterfly image on the main paper.


6. Add a few more embellishments and dots.  I love little black dots (and little black dresses, and little black purses, but not little blackheads) -- they outline things really well without the harshness of a line.

ONE MORE THING:  Why is it that we make cards?  So we can give them away to people who will frame them and show them off in their house, of course. Try putting your beauuuutiful photos on the outside of the card; make it easier for the folks who are going to be displaying your wonderful creation.

Thursday, August 19, 2010

Black & White & "Read" All Over: Simple but bold cards for beginners.


Try making a card using a photo(s) on the front.

I made this card for my sweetie for our anniversary... Here's to one year... and many more to come.  I wanted the card to be elegant, dramatic, and to make a bold statement.  And considering the recipient is a dude, I decided flowers and butterflies might not be appropriate. 

I lightened the exposure a bit on this picture using Picnik, but it didn't show up too well when I took a picture of the card with my iPhone, but you get the idea.  The black background with a bright photo gives some nice contrast.

Obviously this is the same photo, but I printed it twice and chopped part of our heads off.  It feels sorta weird cutting your own face in half. 

I like to make the text of my cards simple.  Hallmark has tons of cards with beautiful language, but in the end, don't you really just want to say "I love you. I mean it."?  That's the point.  I love you.  I mean it.  There you have it.  Done deal.  Finito. 


BTW, I got the idea for this card from Lizzy Kartchner's book 52 More Scrapbooking Challenges.  It's my absolute fav.  She had the suggestion of printing the same photo twice... brilliant!

More simplicity and black/white was in order for the inside of this card.  I wrote the gushy stuff on the inside of the card, which is for Matthew's eyes only... but I also put a cute little tag with our "love date". And, always a fan of repetition, I added another bold statement in the same font as was used on the front.


June 15, 2009:  That was a really good day.

Tuesday, July 6, 2010

Personalized cards make people smile... and that makes ME smile!

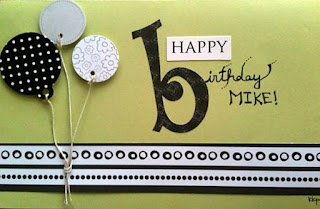
So, I know that I've done a previous post about card making... but I wanted to do another one that's a bit more detailed. Matt's stepdad just celebrated his birthday on July 4th (what a fun birth date, right!) and I wanted to make him a personalized card. Frankly, for personalized cards, I like them to be simple and elegant.  And this is my blog, so that's what I'm going to talk about.  

1. Find the paper that you want to use for the card and fold it in half. I like to fold it top to bottom, rather than sideways, because it stands up easier. This step is important because as you're laying out your elements, you want to see how much space you have to work with.

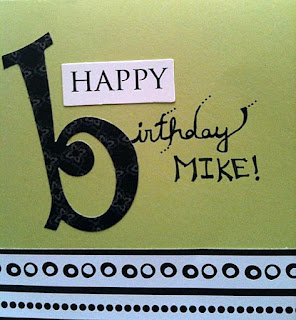
2. Pick a title for your card.  I liked "Happy Birthday"... It's simple and to the point. Matthew is the one who suggested adding Mike's name, for a more personal touch. I told Matthew, "Great suggestion, honey.  Keep it up and I'm going to turn you into a real live scrapbooking machine." He ran away. Anyway, I loved his idea and it definitely made the card. The "HAPPY" is a punch-out from the Colorbok Nocturne collection. The "b" is also Colorbok (XY&Z collection). Both are from scrapbuck.com. 

***FYI: Punch-out kits are won.der.ful. Why? Because they include tons more than if you just buy an alphabet kit. They come with tags, photo frames, borders, paper embellishments, and fun words to add to your pages. And on scrapbuck they are under $5.00. Can I get a "woo-hoo"?!

I chose to handwrite the rest to give it a personal touch.  Play around with different types of lettering (cursive, all caps, etc.).


3. Decide on some embellishments. I was looking through my stash and saw these circular punch-outs (by Best Occasions - a FABULOUS kit). These punch-outs are typically used for tags, but I thought they'd double as balloons rather nicely. I hunted down some string in the black hole (oops, I mean garage) to finish off the balloon look. Here's a tip when using nylon string: after cutting, burn the edges a bit with a match to prevent fraying. Another tip: when it comes to embellishments, odd numbers always tend to be a bit more visually appealing, as well as using different sizes. 


4. As you can see from the very first picture, I put a patterned strip near the bottom of the card. The strip came from a regular piece of 12x12 patterned paper (trimmed to perfection by my trusty Fiskars)... and I liked how the circles and dots coordinated with the polka-dot balloon. There's no trick to perfectly laying out the elements on a card. You just have to play around until it looks good.  Rearrange things a few times before gluing them down. And if you happen to have someone else around, tell them you'll give them a free high five if they tell you their opinion (a free high five might just be the best gift ever).

5. For the inside of personalized cards, I always like to use a picture of me and the card recipient (so they'll ALWAYS remember my awesomeness). Give the photo some bling by adding a border/frame. The border for this photo came from the same Best Occasions kit.   


6. For the personal note inside the card, add some flair by using a large letter (an "M" for Mike). You can also add some snazzy buttons or borders (I added another black and white strip to the inside of the card at the very top).

7. THIS STEP IS KEY: For the personal note, I suggest using a totally separate piece of paper and cutting it to fit. That way, you can write your message and glue it to the inside of the card (use a glue dot roller cuz it's nice and flat). There's nothing worse than ruining your entire card by writing directly on the inside and messing it up in some way. 

What an amazing creation... and another satisfied customer!  Happy Birthday Mike!!


Do you make personalized cards? What's your favorite thing to add to cards to make them unique?

Thursday, May 27, 2010

Custom Cards

How great is it that ALL those scrapbooking supplies can double-duty as card making supplies?! A few weekends ago we had a combo brunch for graduation and Mother's Day. In my opinion, simplified beautiful cards are so much more fun to give (and receive) than those cards from the grocery store that are chalk-full of gooey-ness. So here are my first two attempts at "oh-so-personalized" custom cards using my "oh-so-wonderful" novice craft supplies:


For added dimension, use that squishy tape or foam dots. And buttons make wonderful centers for little tiny paper flowers. (Novice tip: to make really cute tiny butterflies, fold paper in half first, just like when you were a little kid making cut-out hearts.)
For more awesome tips on cardmaking and some great product suggestions, check out Betsy Veldman's blog: http://www.typepad.com/services/trackback/6a00e54efec67b88330134824e72dd970c.