Monday, July 19, 2010

Just pleat it, pleat it. No one wants to be defeated, so pleat it! (MJ lyrics can.and.do coordinate with blog titles for scrapbooking.)


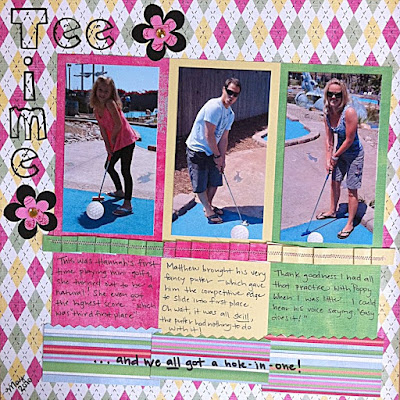
I have two syllables for you: mini-golf.  Shit that was three syllables.  But it was two words so I got half of it right.  I soooo wanted to start out this post with a clever statement.  But FYI it's Monday.  I love my job but I've been hung up on six times already today, which incidentally zaps a bit of my oh-so-precious-never-underappreciated Monday brainpower.  So you get a half-wit today.  Lucky you.

Moving on. 

Matthews (I love that man... he's such a good dad) and I took Hannah mini-golfing a few months back and she was a natural.  Seriously.  I think mini-golf is sorely underappreciated (unlike the Monday brainpower) as a wholesome, somewhat cheap, activity for a nice, sunny day.  Just make sure to wash your hands like EIGHT times afterwards.  Lord knows whose grubby hands have held those clubs before you. 

And when you're done, you can make a scrapbook page about it.  I'm full of ideas today!  Brilliant ones, too.  


Pleats are a cool way to separate things on a page.  On this page, rather than doing a typical photo border, I extended the paper waaaaaaay down so that I'd have room for journaling.  Then I cut a strip of paper and folded it accordion style back and forth and back and forth and back and forth and back and forth.... got it?  Here's the trick: don't double the paper back on itself evenly, otherwise you'll be left with a square (and what you want is a long strip).   Use your glue dot roller to keep those pleats under control (aka flat).  For some extra loveliness, I sewed over the top of the pleats.  (OMG. Yes. Sewed.... and almost took my thumb off in the process.)

Trace Tee-Time title using stencils...

add some flower power...


enlarge the balls using Picnik... (the golf balls, nasty minds)


insert stripes for fabulousness -- and to compliment the ever-present argyle...


and now pat yourself on the back, or pat someone else's back, or pat someone else's behind - if you're so inclined.  Promise me you'll never take up real golf.  Scrapbooking is a much more dangerous sport, anyway. 

Friday, July 16, 2010

I love churros. I hate measuring. Asymmetry is the new black.


Mmmm... love this picture.  It's a DECADE old.  Yes my friends, a decade.  Holy.cow.I'm.getting.old.  This photo was taken on a cruise ship that my family took in November 2000.  Aren't we cute kids!

Today let's focus on the funky photo frame.  It's asymmetrical, doesn't border the whole picture, and uses two different patterns. 

The black paper portion of the border actually came from a regular 12x12 piece.  I used my delicious dexterity skills to snip out the pattern.  The back of the same paper was striped.  FYI: I LOVE paper that is double sided (ok, duh... all paper is double-sided... I love paper that has patterns or colors on both sides).  The main reason I love it is because the designers typically coordinate the two sides so that they match and coordinate.  THANK you designers.  You are a beginner scrapper's BFF.


Now please also notice that the paper is striped, but I used the stripes in a different orientation... on the top border the stripes are vertical and on the bottom border, they are diagonal.  Get frisky with your Fiskars and just turn the paper a quarter-turn (prior to trimming) to achieve this effect.

Next please notice that on the top part of the border, the black curly-q's are indented about 1/2 inch from the edge, but on the bottom border, the curly-q's are flush with the edge. 

With funky frames such as this one, nothing has to match or be measured perfectly.  By now it's apparent how much I hate measuring things anyway. =)

Here are a few more pics of this page... for your viewing pleasure... and because my iPhone4 takes such killer pictures.  Yes, these pics were taken from a phone.  Yahoooo!

Fabulous flowers!


An off-center snippet.


Photo slipped beneath page (use an Xacto knife)
with "snippet" frame overlapping for depth.

 By the way.  Today I want to announce how much I like churros.  I just had one from Rubio's for dessert and ordering one might just be the best decision I make all day.  Tasty treat.

Wednesday, July 14, 2010

Kreate by KeKe on Kludgy Mom!

Hop on over to Kludgy Mom to read my guest post about using craft knives to create faaaaabulous photo borders!

And if you'd like to see more examples & photos of the layouts from that guest post, please click here.

Thanks everyone and have a wonderful Wednesday. =)

Tuesday, July 13, 2010

Depth Perception: Creating scrapbooking pages that evoke deep emotion.

Good morning to everyone!  First I want to remind you all to please check out my guest post on Kludgy Mom on Wednesday.... Yay! 


This layout is for my sweet dog Kash-Pea who passed away about seven years ago.  It's hard to believe that much time has gone by, but he is still my angel and I think of him often.  I wanted to do a layout to highlight this picture of us taking a nap together... it's one of my favorites.  Unfortunately, this photo doesn't show off Kash's awesome underbite and male-pattern baldness.  He was a handsome fellow! 

Today's lesson is on layering elements to enhance depth.

1.  The flowers from this page came from a regular ol' patterned paper and I just cut them out.  If you want to duplicate this, I suggest finding a large pattern that you love and then work with the pattern to create your layout.

2.  Pick a frame for your photo which doesn't detract from the large pattern... Here, you'll notice I picked a cream color to match the pattern background.  Also notice that I didn't busy up the page with any other patterned paper... Sometimes simplicity is beautiful.

3.  Layering technique #1 is to piece together different portions of the pattern that you've cut out and simply place them on top of one another.


4.  Layering technique #2 is leave some negative space between the photo and the mat and then weave the pattern underneath and on top of the mat.


5. Layering technique #3 is to add yummy embellishments on top of the pattern to give it some kick.  I used some metal sticky frames (I think they are by K & Company) and stuck them on top of a few of the flowers.  I'm pretty sure they are intended to frame photos... but they happened to fit pretty perfectly.  See:


6.  Layering technique #4 is to add some some sticky rhinestones or 3-D flower stickers (which actually came from my original scrapbooking kit that I bought waaaaaay back in October 2009).  For some variety, I decided to add these to flowers where I didn't use the circular metal borders.


7.  The next technique is to create a block-like title and use some foam tape to make it 3-D.  Use that negative space from step 4 to layer your title between the photo and the mat.


 8.  And finally (whew!) make a fabulous frame around your journaling... the rest of the layout is relatively simplistic (simplicity in the scrapbooking world is somewhat of an oxy-moron) so you can gussy up your journaling a bit.  Repetition, repetition, repetition: I used another circular sticky frame to go around my journaling and layered it on top of the pattern.  But notice (sneaky KeKe) that the plain white paper is actually layered beneath the pattern. 


Here is a tip:  This layout took me several sittings to complete because it made me sad every time I sat down to work on it... but the patience paid off because I think this simple-yet-sophisticated page is a perfect tribute to my Mr. Handsome Pants (poor dog had about 300 nicknames).  If you ever feel frustrated, stuck, or any other burdensome emotion, put it away for a few days.  Pages that evoke strong emotion definitely deserve your all.  I love you Kash-Pea.


ONE FINAL ANNOUNCEMENT:  I'm looking for other crafters who would like to do a guest post in the upcoming weeks.  I prefer it to be scrapbook or card-making related, but I'm open to suggestions!  Please contact me directly at kreatebykeke@gmail.com.  And remember.... Kludgy Mom tomorrow...!!!

Monday, July 12, 2010

Blue skies and some very exciting news!

Today's post will be short and sweet... Inspiration for scrapbook page layouts can come from anywhere.  And the photos used don't have to be of people.  Take pictures of things you think are beautiful.  I love taking pictures of the sky, because I always remember where I was standing and how I was feeling at that particular moment.


My most exciting news is that I will be doing a guest post on Kludgy Mom!!!  Watch for it this upcoming Wednesday... I am soooo excited. =)   Please visit her blog on Wednesday! The topic will involve sharp knives...

Friday, July 9, 2010

Flip to my loo my darlin!

Lots of flip offs this week... but so therapeutic still!   Thanks to Gigi at Kludgy Mom for creating Friday Flip-Offs.... let's rid ourselves of alllllll the crazy, unnecessary, totally stressful, ridiculousness of the week!


1. To my heartburn: I'm not a 65-year old man.  What gives?  Why can't I eat spicy food in peace?  FLIP OFF.
2. To my scrapbooking habit: You're costing me a LOT of money.  I love you, but FLIP OFF.
3. To our garage: It seems like the pile of nothingness just keeps growing and growing.  Can I wish for a sink hole to be created right underneath you so that everything will just disappear?  FLIP OFF.
4. To the weather in San Diego: It's called summer.  AKA opposite of winter.  We had May Gray.  We had June Gloom.  Isn't July supposed to be gorgeous?  COME ON!  I need a tan and some Vitamin D already!  FLIP OFF.
5. To the smell of manure outside my office: Thank you, gardeners, for making the flowers pretty... but didn't you take the soppy weather into account?  It's impossible for the stench to disappear when the moist air keeps permeating it deeper into the soil.  It.smells.horrible.  FLIP OFF.

Can you tell I'm glad it's Friday?  Hope everyone has a great weekend!  Now link up and enjoy the therapy!

Wednesday, July 7, 2010

If your dog doesn't like somebody, maybe you shouldn't either.


Here's a fabulous inspiration for a layout. 

Look at the call log in your phone (I'll just look on my new 4G, take that Dr. Pepper!) and figure out who calls you the most.  And then dedicate a WHOLE page just to them... sort of like an Ode to the Person Who Makes Me Feel Popular.  The winner for me: my awesome mom... who logged a total of ELEVEN calls to me yesterday (I just know that there must be some glitch in the iPhone software... eleven, really?).

Anywho.  Here's a page just for the special lady.  And the steps for the masterpiece:

1. Pick your pics. I took some of my very favorite pictures of her and luckily she was wearing red in all of them... and her favorite color is blue.  The pictures were all different sizes, and rather than refiguring the "perfect" photo size, I decided to do some patchwork and make the focal point the center of the page (rather than one specific photo).

2. Pick your paper. What comes next? You got it: coordinating paper to match the photos and add a personal touch by complimenting with her favorite color.  

*Let's focus on step 3*


3. Pick something personal. Find something that you either received from the person, or something that reminds you of them and incorporate it into the page.  Wacky Jacque (aka my mom) is notorious for sending funny notes to me in the mail.  She also has a knack for finding greeting cards that don't mean anything, but mean the world, at the same time.  So, I found two that I love (and one happened to be red... extra points for color coordination) and cut them to size.  

***Adding these types of touches is what truly makes layouts unique.*** 
There are tons of pre-fabricated layouts from which to choose, but when you add something that is yours, it becomes your masterpiece.  Aren't I brilliant?


4. Pick your nose.  Just kidding.  Step Four is: Pick some pretty petals...or some other embellishment for sparkle-factor.  I picked a little flower stamp and was able to use two different ink colors.  I'm still mastering this stamp thing, so I'm not going to go into too much detail (or do a post about it) until I can give you the Full KeKe. 


5. Pick up your Fiskars and start trimming.  To continue with the patchwork look, I decided to do two large angular shapes.  The patchwork of the photos is very squared off.  By adding some triangular shapes (and some diagonal flow) the square is somewhat broken up.  Once you've got the triangles cut, play around with the Fiskars by snipping off a few of the sides to create some negative space.

6. Pick up your pen.  Use the negative space created in Step Five to do some journaling... a perfect topic for journaling on this page would be a few reasons why that person is #1 on your call log.  In this case, it's because my mom thinks I'm so damn cool... for you, it might be because you have a stalker.  In either case, you have created a beeeeeeeautiful layout.  Congratulations. 

I would love to know: where do you get inspiration for unique layouts?